Elements Mobile Protection for iOS
A collection of short easy steps to get started in taking the product into use
Follow the steps below to get started with the product.
Step 1 - Creating a WithSecure™ Business Account
You need a WithSecure™ Business Account to access WithSecure™ Elements Security Center, which is the unified management platform for managing all WithSecure™ Elements products. There are two scenarios:
- When you purchase the product from a WithSecure partner, the partner typically creates a Business Account for the first administrator in your organization. If this applies to you, you have received an email from WithSecure with a temporary password and a link to log in to Elements Security Center.
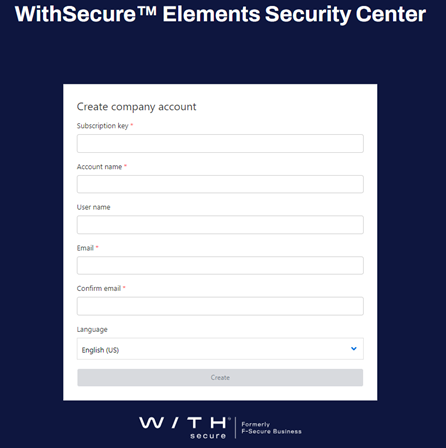
- If your account has not yet been created, but you have received a subscription key from your partner, you can use the subscription key to create a WithSecure™ Business account for the first administrator in your organization. To do that, use the company self-registration link for your specific region:
- For Europe, Middle-East, and Africa: https://emea.epp.elements.withsecure.com/#/create-company-account
- For America: https://amer.epp.elements.withsecure.com/#/create-company-account
- For Asia Pacific: https://apac.epp.elements.withsecure.com/#/create-company-account
- For Europe, Middle-East, and Africa: https://emea.epp.elements.withsecure.com/#/create-company-account

After completing the company self-registration, you will receive an email from WithSecure with a temporary password and a link to log in to the portal.
Step 2 – Adding the Android app configuration policies
Use the Business Account to log in to WithSecure™ Elements Security Center at https://elements.withsecure.com/.
All product settings are under Endpoint Protection on the sidebar.
Step 3 - Adding devices to your organization
After logging in, add devices for management by sending an email invitation - for manually installing devices.
Sending an email invitation
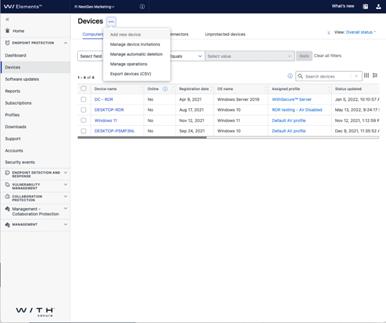
- In Elements Security Center, select Endpoint Protection > Devices > Mobile devices.
- Next to Devices, select > Add new device.

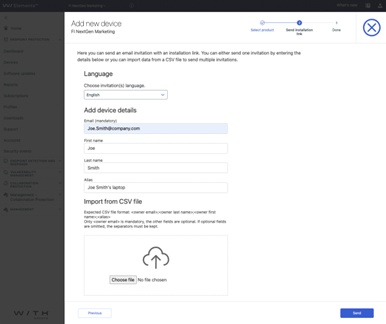
- Select the subscription to use and select Next.
- Follow the steps in the wizard and send an email invitation to one or more users with a download link to the installer.

Step 4 – What end users need to do when receiving the email
Instruct the users to follow these steps to install the app on their iOS devices.
Note: In the following steps, "you" refers to end users.
You receive an email from your administrator instructing you to install the app. The email contains a link for installing the app on one device and a link to activate your license.
To install the app:
- Open the invitation email.
- Select the link next to iOS.
You are redirected to App Store where you can download and install the WithSecure Mobile Protection app. - After you have installed the app on your device, go back to the installation email and select Activate for iOS to activate the subscription.
The WithSecure Mobile Protection app opens.
Note: The activation link is valid for 29 days, but you can only use the link once. If you log in to the app using the username and password that are provided in the email, but you do not manage to activate the license, you can try using the activation link. If you, however, first select the activation link and, for some reason, it does not work, you can no longer manually enter the credentials. - When asked, select Allow to give the app the required permissions.
Note: The app needs permission to notify you about important events.