Elements Mobile Protection for Android
A collection of short easy steps to get started in taking the product into use
Follow the steps below to get started with the product.
Step 1 - Creating a WithSecure™ Business Account
You need a WithSecure™ Business Account to access WithSecure™ Elements Security Center, which is the unified management platform for managing all WithSecure™ Elements products. There are two scenarios:
- When you purchase the product from a WithSecure partner, the partner typically creates a Business Account for the first administrator in your organization. If this applies to you, you have received an email from WithSecure with a temporary password and a link to log in to Elements Security Center.
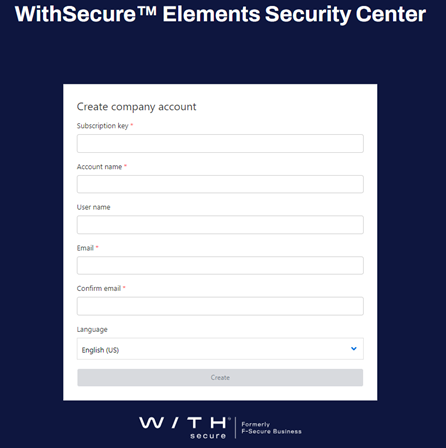
- If your account has not yet been created, but you have received a subscription key from your partner, you can use the subscription key to create a WithSecure™ Business account for the first administrator in your organization. To do that, use the company self-registration link for your specific region:
- For Europe, Middle-East, and Africa: https://emea.epp.elements.withsecure.com/#/create-company-account
- For America: https://amer.epp.elements.withsecure.com/#/create-company-account
- For Asia Pacific: https://apac.epp.elements.withsecure.com/#/create-company-account
- For Europe, Middle-East, and Africa: https://emea.epp.elements.withsecure.com/#/create-company-account
After completing the company self-registration, you will receive an email from WithSecure with a temporary password and a link to log in to the portal.
Step 2 – Adding the Android app configuration policies
Use the Business Account to log in to WithSecure™ Elements Security Center at https://elements.withsecure.com/.
All product settings are under Endpoint Protection on the sidebar.
Step 3 - Adding devices to your organization
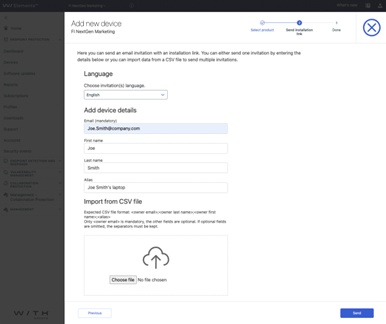
After logging in, add devices for management by sending an email invitation - for manually installing devices.
Sending an email invitation
- In Elements Security Center, select Endpoint Protection > Devices > Mobile devices.
- Next to Devices, select > Add new device.

- Select the subscription to use and select Next.
- Follow the steps in the wizard and send an email invitation to one or more users with a download link to the installer.
Step 4 – What end users need to do when receiving the email
Instruct the users to follow these steps to install the app on their Android devices.
Note: In the following steps, "you" refers to end users.
You receive an email from your administrator instructing you to install the app. The email contains a link for installing the app on one device and a link to activate your license.
To install the app:
- Open the invitation email.
- Select the link next to Android.
You are redirected to Google Play Store where you can download and install the WithSecure Mobile Protection app. - When asked, select Allow to give the app the required permissions.
Note: The app needs permission to access your photos, media, and files to be able to scan for harmful items.